Shaky hands ruin sharp photos. The fix is a stack of small techniques — how you grip the camera, where your elbows go, how you breathe, what shutter speed you choose, and when you let gear do the work. Stack them and even a coffee-jittered hand can produce a tack-sharp frame.
Brace the camera with both hands, tuck elbows to ribs, plant feet shoulder-width apart, exhale halfway, then gently squeeze (don’t punch) the shutter. Use a shutter speed at least as fast as 1 divided by your focal length, switch on image stabilization, and lean on a tripod or monopod when the light gets low.
First, Tell Camera Shake From Subject Motion
Blur is not always your hand’s fault. Before you blame your nerves, work out which kind of blur you’re actually getting:
The Shutter Speed Rule
The single biggest weapon against shaky-hands blur is shutter speed. The classic rule:
This is a full-frame rule. On a crop sensor (APS-C, Micro Four Thirds), multiply by the crop factor: a 50 mm lens on an APS-C body acts like 75–80 mm, so the minimum becomes about 1/80 second.
| Lens focal length | Full-frame minimum | APS-C minimum (×1.5) | Micro 4/3 minimum (×2) |
|---|---|---|---|
| 24 mm | 1/30 s | 1/40 s | 1/50 s |
| 35 mm | 1/40 s | 1/60 s | 1/80 s |
| 50 mm | 1/60 s | 1/80 s | 1/100 s |
| 85 mm | 1/100 s | 1/125 s | 1/160 s |
| 135 mm | 1/160 s | 1/200 s | 1/250 s |
| 200 mm | 1/200 s | 1/320 s | 1/400 s |
| 400 mm | 1/400 s | 1/640 s | 1/800 s |
If your hands are particularly jittery, double these numbers. It’s cheaper to push ISO than to ruin a frame.
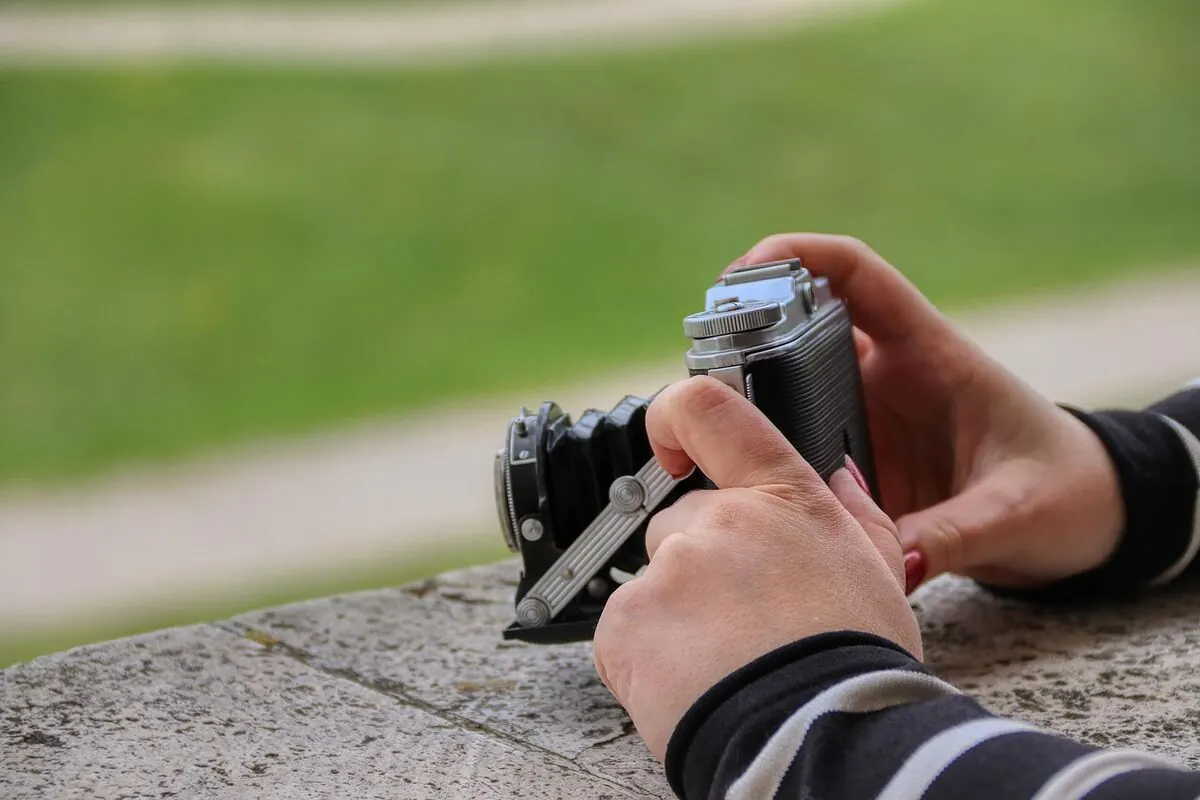
The Right Grip (Drawing)
Most photographers hold the camera badly. The correct grip cradles the lens from underneath so the camera is supported, not pinched.
Step by step
Left hand under the lens
Place your left palm UNDER the lens, fingers wrapped around the barrel. This carries the weight. If your left hand is on the side of the camera, you’re doing it wrong.
Right hand on the grip
Wrap the right hand around the grip with the index finger resting (not pressing) on the shutter. The thumb sits at the back, ready to adjust settings.
Camera against your face
Bring the viewfinder firmly to your eye. The forehead and nose become a third contact point — three points of contact beat two.
Elbows tucked
Pull both elbows in toward your ribs. Elbows floating in the air = wobble. Elbows locked to your torso = a tripod made of bone.
Body Posture (Drawing)
Your stance is half the battle. Think “stable platform” — feet set, weight balanced, core engaged.
- Feet: shoulder-width apart, one foot slightly forward. Weight balanced, knees soft (never locked).
- Hips: aimed at the subject so your shoulders don’t have to twist.
- Core: gently engaged — not flexed hard, just “alive”.
- Shoulders: down and relaxed. Hunched shoulders amplify tremor.
- Neck: long, head neutral. Don’t crane.
The Breathing Trick (Snipers Stole It Too)
Heartbeats and breath both move your camera. Marksmen learned long ago that there is a calm window between heartbeats after a half exhale. Photographers use the same trick.
- Inhale slowly through the nose.
- Exhale about halfway out through the mouth.
- Pause naturally for one to two seconds.
- Squeeze (don’t stab) the shutter during that pause.
- Finish exhaling. Don’t hold your breath longer than three seconds — your hands get worse, not better.
Squeeze, Don’t Punch the Shutter
Stabbing the shutter button is a self-inflicted wound. The jab tilts the camera downward right at the moment of exposure. Treat the shutter like a trigger: roll the pad of your index finger straight back. The release should almost feel like an accident.
If your camera supports a two-stage shutter (half-press to focus, full-press to fire), use it. Half-press first, settle, then complete the press.
Use the Gear That Was Built for This
Camera Settings to Fight Shake
| Setting | What to do | Why |
|---|---|---|
| Shutter priority (Tv / S) | Lock shutter to safe value first | Camera adjusts aperture so you never drop below your minimum |
| Auto-ISO with minimum shutter | Set minimum shutter; let ISO float | Modern sensors handle ISO 3200–6400 well; blur is unfixable, grain isn’t |
| IBIS / IS / VR | On for handheld, OFF on a tripod | Some stabilizers fight against a still tripod and add micro-jitter |
| Drive mode | Continuous low (CL) burst | Three frames lets you toss the shaky first one |
| Self-timer | 2 seconds when on tripod | Removes shutter-press vibration |
| Electronic first curtain | On for shutter speeds 1/30 to 1/4 s | Kills the first-curtain shock that causes “shutter shock” |
Practice Drills
1. The penny drill
Balance a coin on top of your camera (on a flat spot, not the lens). Take ten shots without the coin falling. You’ll discover exactly how much your hands move.
2. The slow-shutter ladder
At a fixed focal length, take a frame at 1/60, 1/30, 1/15, 1/8, 1/4. Find the slowest speed where you still get a sharp shot 9 out of 10 times. That’s your personal limit. Improve it weekly.
3. The single-breath rule
For one full session, only fire on a half-exhale. The keeper rate jumps almost immediately.
4. Forearm work
Heavy cameras are easier to hold if the forearms are strong. Two minutes of dead-hangs or farmer carries a day, and your tremor at full extension drops noticeably in a few weeks.
Lifestyle Things That Make Tremor Worse
- Caffeine — most reliable shake amplifier on Earth. Cut the espresso before a critical shoot.
- Cold — muscles tremor to generate heat. Layers, hand warmers, gloves with fold-back fingertips.
- Sleep debt — even one short night doubles fine-motor tremor.
- Low blood sugar — eat something before a long session.
- Anxiety / heavy breathing — slows after a few box-breaths (4-4-4-4).
- Post-workout shake — wait 20–30 minutes after lifting before shooting.
Cheat Sheet
| Situation | Move |
|---|---|
| Indoor low light, 35–50 mm | Open up to f/1.8–2.8, push ISO to 1600–3200, brace against a wall |
| Concert, 70–200 mm | Monopod, IS on, shutter 1/250 s minimum, single-shot burst of 3 |
| Street, 28–35 mm | Two-hand grip, half-exhale, shutter 1/125 s |
| Landscape, golden hour | Tripod, 2-second timer, IS off, electronic first curtain on |
| Wildlife, 400 mm+ | Tripod or monopod, shutter 1/1000 s, IS on, beanbag if shooting from a car |
| Macro | Tripod always. Remote shutter. Manual focus rail if possible. |
FAQs
How can I stop my hands from shaking when taking a photo?
Brace the camera with both hands (left under the lens), tuck both elbows tight to your ribs, plant feet shoulder-width, exhale halfway, and gently squeeze the shutter. Stack that with IS and a safe shutter speed and most of the shake disappears.
What shutter speed prevents camera shake?
Start at 1 divided by your focal length in millimeters (1/50 s for a 50 mm lens). On a crop sensor, multiply by your crop factor. Double the number if your hands are jittery or you’ve had caffeine.
Does image stabilization fix shaky hands completely?
It helps by two to seven stops, but it can’t freeze a moving subject and it’s not a substitute for technique. Treat IS as insurance, not the plan.
When should I use a tripod or monopod?
Tripod whenever the shutter drops below 1/30 s, for any landscape, architecture, macro or astro shot, and for telephoto over 200 mm. Monopod is the compromise when you still need to move quickly — sports, wildlife.
Does breathing really help with sharper photos?
Yes. Inhale, exhale halfway, pause for one or two seconds, then squeeze the shutter inside that calm window. Don’t hold your breath more than three seconds.
Are shaky hands a sign of a medical problem?
Mild trembling after coffee, exercise, cold, or stress is normal. Tremor that gets worse over time, only affects one hand, or appears at rest should be discussed with a doctor.
Final Answer
Sharp photos are made of small habits stacked together. Hold the camera correctly, anchor your body, manage your breath, pick a shutter that fits the focal length, and let the gear (IS, tripod, timer) cover the gap your technique can’t. Do the four practice drills for a week and your keeper rate climbs without buying anything new.
Shaky hands aren’t a death sentence for photography. They’re a problem that has been solved a thousand times by people with worse hands and cheaper gear than yours.