ما يجب أن تعرفه عند تثبيت أجهزة التوجيه اللاسلكية المنزلية (Wi-Fi)
١٥ ديسمبر ٢٠٢٢ • سيزار دانييل باريتو
One commonality that stands out when discussing Cisco network routers and switches: is the renowned Internetwork Operating System (IOS). This powerful “engine” is what powers all of these devices, ensuring their successful operation. This article will primarily center on iOS and analyze how to manipulate it. Before that occurs, though, I’d like you to be aware of the two distinct approaches used when operating with iOS: either through a Command Line Interface (CLI) or Graphical User Interface (GUI).
واجهة سطر الأوامر (CLI) هي طريقة متقدمة لتكوين أجهزة IOS. باستخدام CLI، يمكننا إدخال أوامر دقيقة ستؤدي إلى حدوث السلوك المطلوب. لذلك، سيكون لدينا سيطرة كاملة ووصول إلى أجهزة التوجيه أو المحولات الخاصة بنا.
توفر واجهة المستخدم الرسومية (GUI) نهجًا أكثر سهولة في الاستخدام لإدارة الأجهزة مثل هذه. غالبًا ما نعتمد عليها عند إعداد أجهزة الشبكة الصغيرة مثل أجهزة التوجيه اللاسلكية المنزلية (Wi-Fi). سيتناول هذا القسم كيفية وصول المستخدمين إلى Cisco IOS (الإصدارات 15.2 أو 12.4) من خلال واجهة سطر الأوامر لتحقيق تشغيل فعال.
مقدمة إلى CLI
تكوينات جهاز التوجيه الأساسية
Now it’s time to dive into the exciting bits of this article and begin with a Cisco Router setup. Moreover, we will utilاستخدام محاكي الشبكة لإنشاء بيئة شبكتنا.
To ensure that our Cisco Router is up and running, here are some critical settings we’ll configure:
- اسم المضيف: اسم الجهاز.
- كلمات المرور: مشفرة بشكل آمن أو يتم نقلها في صيغة مفتوحة وغير مشفرة.
- عناوين IP: داخل الواجهات.
الوصول عن بعد: إدارة أجهزتك الشبكية بسهولة من خلال اتصالات Telnet أو SSH الآمنة.
أ) مستويات وصول المستخدم في Cisco IOS
لقد طوروا ثلاثة مستويات وصول مع أنشطة مميزة متاحة لكل مستخدم لأسباب أمنية.
- تحقق من اتصالك بالإنترنت عن طريق تشغيل أوامر مثل ping أو traceroute. (>)
- Get an inside look into what’s actually happening with the device. (#)
- لإجراء أي تغييرات. (config)#
عند الاتصال بجهاز Cisco مثل جهاز التوجيه أو المحول أو الجدار الناري، سيتم منحك المستخدم وضع التنفيذ (>) – the primary access level. With this user exec access level, you can only perform basic commands such as ping and traceroute.
To access a greater set of commands and privileges, it’s essential to enter the following command: Router>enable. This will allow you to ascend the ladder and upgrade your level of control.
لقد وصلنا إلى مستوى الوصول الثاني: وضع الامتياز – R1#. Here you can observe every action taken with the equipment (through various show commands), yet you cannot make any changes.
راوتر>تمكينراوتر#To create alterations to the device, we would have to advance our access level up an additional notch – reaching a commanding level known as وضع التكوين العالمي. يوفر لنا هذا الوضع المرموق قدرات وامتيازات أكبر من ذي قبل.
راوتر#تكوين طرفيةراوتر(تكوين)#By accessing the Cisco device’s global configuration mode, you can make any desired alterations with complete control – akin to having Windows Administrator or root user access on Linux.
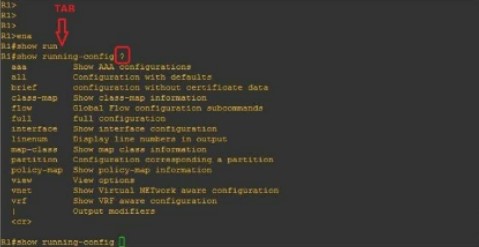
To ensure you’re prepared for any challenge, here are a few commands that I highly suggest familiarizing yourself with: If you want to save time and typing effort while still ensuring accuracy, we’ve got the perfect solution for composing longer commands.
When you type “R1#show run” and hit the TAB key, it will autocomplete your command. Furthermore, if you enter a question mark (?), any subsequent commands will be displayed on-screen.
ب) اختيار اسم الجهاز (اسم المضيف)
لتغيير اسم جهاز التوجيه أو المحول، كل ما عليك فعله هو إدخال هذا الأمر: (ستراه في الصورة التالية)
راوتر(تكوين)#اسم المضيف ROUTER_NAMEROUTER_NAME(تكوين)#ج) تأمين الوصول إلى جهاز التوجيه
To protect your Router against unauthorized access, let’s look into how we can set up a password in privilege mode (#). Follow this straightforward process to complete the task:
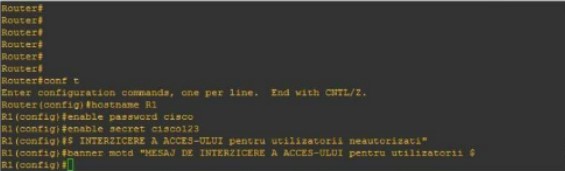
راوتر(تكوين)#اسم المضيف R1R1(config)#enable password cisco أوR1(تكوين)#تمكين السر cisco123استخدام هذا الأمر سيضع لافتة تحذير لأي شخص يحاول الوصول إلى الجهاز، تنبههم بالعواقب المحتملة.
R1(تكوين)#شعار motd "الوصول غير المصرح به مرفوض"If your query is regarding the distinctions between an “enable password”, and a “secret enable,” you’ve come to the right place. Here’s what sets them apart:
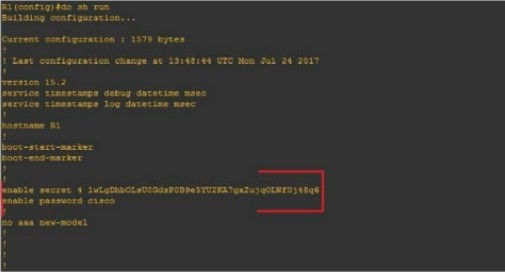
يتم ترميز تكوين واحد (#enable secret) بينما يبقى الآخر (#enable password) غير مشفر.
Let’s begin by configuring the Router for network access (reachability) using the following topology:
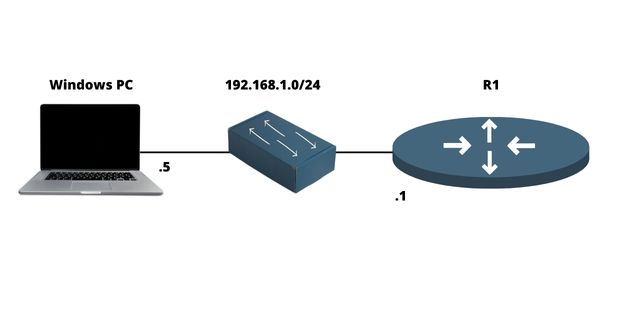
د) تكوين عنوان IP على جهاز التوجيه
يعد جهاز التوجيه أداة لا تقدر بثمن تتيح لنا ربط شبكات متعددة بسلاسة عبر منافذ مختلفة، عادةً اثنين أو ثلاثة. نشير إلى المنفذ كالمساحة المادية التي يمكن توصيل كابل بها. أما بالنسبة لجانبها المنطقي المقابل، فنحن نحددها كواجهة.
لتلخيص:
- المنفذ = مادي
- الواجهة = منطقية
على سبيل المثال، سنقوم بتكوين عنوان IP (منطقي) على الواجهة وتوصيله فعليًا بمنفذ عبر كابل.
لكي يتم أي اتصال داخل الشبكة، تحتاج هذه الواجهات إلى عنوان IP ويجب تمكينها، مما يعني تشغيلها. كما هو موضح في الشكل، يمكنك بسهولة تكوين عنوان IP على واجهة الشبكة:
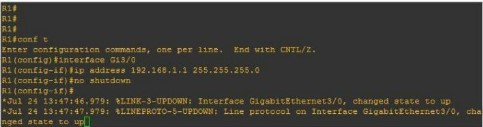
R1(تكوين)#واجهة FastEthernet0/0R1(config-if)#ip العنوان 192.168.1.1 255.255.255.0R1(تكوين-واجهة)#لا إغلاقو) تكوين الوصول عن بعد على جهاز التوجيه (Telnet، SSH)
تلنت
توفر تطبيقات الشبكة اتصالات عن بعد آمنة بالشبكات أو الأجهزة (مثل أجهزة التوجيه والمفاتيح) أو الخوادم. يضمن ذلك الوصول الموثوق به من أي موقع.
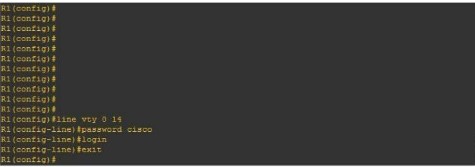
R1(تكوين)#خط vty 0 14R1(تهيئة-الخط)#كلمة المرور سيسكوR1(config-line)#تسجيل الدخولTo get started, we’ll need to enter our virtual lines (a total of 15), set the password (“Cisco”), and then initiate the Telnet process #login.
إس إس إتش
To safely connect to a local area network or Internet device remotely, SSH is the ideal protocol. To configure this on Cisco machines, it’s necessary to take certain steps:
- إنشاء تسجيل دخول شخصي وكلمة مرور.
- إنشاء اسم نطاق
- لضمان أقصى درجات الأمان، من الضروري توليد مجموعات المفاتيح العامة والخاصة.
- لتمكين عملية الخطوط الافتراضية (vty)، استخدم الأمر #login local.
في الشكل أدناه، يمكنك رؤية مثال على تكوين SSH على جهاز توجيه Cisco:
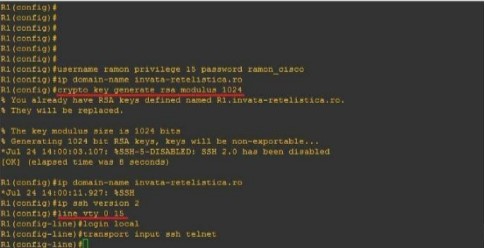
R1(تكوين)#اسم المستخدم admin امتياز 15 كلمة المرور admincisco321R1(تكوين)#عنوان IP اسم النطاق my.home.labR1(تكوين)#توليد مفتاح تشفير rsa بمقدار 1024R1(تكوين)#عنوان IP إصدار ssh 2R1(تكوين)خط vty 0 15R1(تكوين-خط)#تسجيل الدخول المحليR1(تكوين-خط)#إدخال النقل ssh تلنتلتلخيص
جهاز التوجيه ضروري device in any computer network because it interconnects multiple networks together. It has different networking protocols enabled (like RIP and OSPF) that assist him with the interconnection process. It also offers many different configurations for security purposes (like passwords on Virtual lines). In this article, we’ve learned how to set up an IP address on the Router, as well as for remote access (Telnet & SSH). We’ve also learned about some of the most important configurations يجب أن يعرفه مدير الشبكة.

سيزار دانييل باريتو
سيزار دانييل باريتو كاتب وخبير مرموق في مجال الأمن السيبراني، معروف بمعرفته العميقة وقدرته على تبسيط مواضيع الأمن السيبراني المعقدة. وبفضل خبرته الواسعة في مجال أمن الشبكات وحماية البيانات، يساهم بانتظام بمقالات وتحليلات ثاقبة حول أحدث اتجاهات الأمن السيبراني، لتثقيف كل من المحترفين والجمهور.