홈 무선 라우터(Wi-Fi) 설치 시 알아야 할 사항
2022년 12월 15일 • 세사르 다니엘 바레토
One commonality that stands out when discussing Cisco network routers and switches: is the renowned Internetwork Operating System (IOS). This powerful “engine” is what powers all of these devices, ensuring their successful operation. This article will primarily center on iOS and analyze how to manipulate it. Before that occurs, though, I’d like you to be aware of the two distinct approaches used when operating with iOS: either through a Command Line Interface (CLI) or Graphical User Interface (GUI).
명령줄 인터페이스(CLI)는 IOS 장치를 구성하는 정교한 방법입니다. CLI를 활용하여 원하는 동작을 발생시키는 정확한 명령을 입력할 수 있습니다. 따라서 라우터나 스위치에 대한 완전한 제어와 접근이 가능합니다.
GUI(그래픽 사용자 인터페이스)는 이러한 장치를 관리하기 위한 훨씬 더 사용자 친화적인 접근 방식을 제공합니다. 종종 홈 무선 라우터(와이파이)와 같은 소규모 네트워크 장치를 설정할 때 이를 사용합니다. 이 섹션에서는 사용자가 효율적인 작동을 위해 명령줄 인터페이스를 통해 Cisco IOS(버전 15.2 또는 12.4)에 접근할 수 있는 방법을 탐구할 것입니다.
CLI 소개
기본 라우터 구성
Now it’s time to dive into the exciting bits of this article and begin with a Cisco Router setup. Moreover, we will util네트워크 시뮬레이터를 사용하여 네트워크 환경을 구축합니다.
To ensure that our Cisco Router is up and running, here are some critical settings we’ll configure:
- 호스트 이름: 장치의 이름.
- 비밀번호: 안전하게 암호화되거나 공개된 비암호화 형식으로 통신됩니다.
- IP 주소: 인터페이스 내에서.
원격 액세스: 안전한 텔넷 또는 SSH 연결을 통해 네트워크 장치를 쉽게 관리할 수 있습니다.
a) Cisco IOS의 사용자 접근 수준
보안상의 이유로 각 사용자에게 제공되는 활동이 다른 세 가지 접근 수준을 개발했습니다.
- ping 또는 traceroute와 같은 명령을 실행하여 인터넷 연결을 확인하십시오. (>)
- Get an inside look into what’s actually happening with the device. (#)
- 변경 사항을 적용하려면. (config)#
라우터, 스위치 또는 방화벽과 같은 Cisco 장치에 연결하면 사용자 실행 모드 (>) – the primary access level. With this user exec access level, you can only perform basic commands such as ping and traceroute.
To access a greater set of commands and privileges, it’s essential to enter the following command: Router>enable. This will allow you to ascend the ladder and upgrade your level of control.
두 번째 접근 수준에 도달했습니다: 특권 모드 – R1#. Here you can observe every action taken with the equipment (through various show commands), yet you cannot make any changes.
라우터>활성화라우터#To create alterations to the device, we would have to advance our access level up an additional notch – reaching a commanding level known as 글로벌 구성 모드. 이 고귀한 상태는 이전보다 더 큰 기능과 특권을 제공합니다.
라우터#구성 터미널라우터(구성)#By accessing the Cisco device’s global configuration mode, you can make any desired alterations with complete control – akin to having Windows Administrator or root user access on Linux.
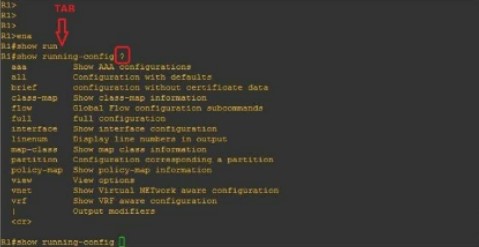
To ensure you’re prepared for any challenge, here are a few commands that I highly suggest familiarizing yourself with: If you want to save time and typing effort while still ensuring accuracy, we’ve got the perfect solution for composing longer commands.
When you type “R1#show run” and hit the TAB key, it will autocomplete your command. Furthermore, if you enter a question mark (?), any subsequent commands will be displayed on-screen.
b) 장치 이름 선택 (호스트 이름)
라우터나 스위치의 이름을 변경하려면 이 명령을 입력하기만 하면 됩니다: (다음 이미지에서 볼 수 있습니다)
라우터(구성)#호스트 이름 라우터_이름라우터_이름(구성)#c) 라우터에 대한 접근 보안
To protect your Router against unauthorized access, let’s look into how we can set up a password in privilege mode (#). Follow this straightforward process to complete the task:
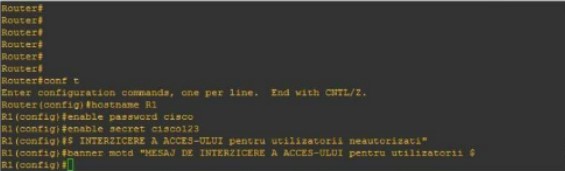
라우터(구성)#호스트 이름 R1R1(config)#enable password cisco 또는R1(구성)#활성화 비밀 cisco123이 명령을 사용하면 장치에 접근하려는 사람에게 잠재적 결과를 경고하는 경고 배너를 설정할 수 있습니다.
R1(구성)#배너 motd "무단 접근 금지"If your query is regarding the distinctions between an “enable password”, and a “secret enable,” you’ve come to the right place. Here’s what sets them apart:
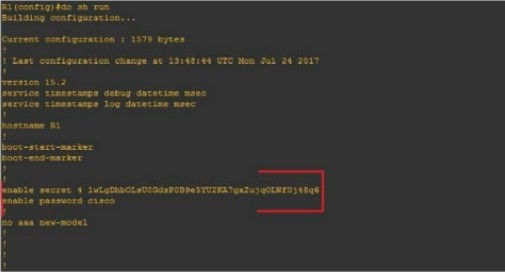
하나의 구성(#enable secret)은 암호화되고 다른 하나(#enable password)는 암호화되지 않습니다.
Let’s begin by configuring the Router for network access (reachability) using the following topology:
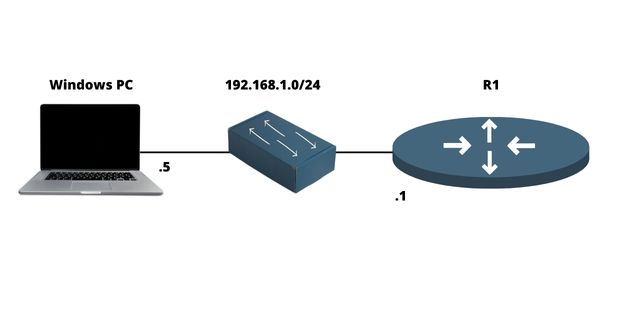
d) 라우터에 IP 주소 구성
라우터는 일반적으로 두 개 또는 세 개의 포트를 통해 여러 네트워크를 원활하게 연결할 수 있는 귀중한 도구입니다. 포트는 케이블을 연결할 수 있는 물리적 공간을 의미합니다. 그에 해당하는 논리적 측면은 인터페이스로 식별합니다.
요약하자면:
- 포트 = 물리적
- 인터페이스 = 논리적
예를 들어, 인터페이스에 IP(논리적) 주소를 구성하고 케이블을 통해 물리적으로 포트에 연결할 것입니다.
네트워크 내에서 통신이 이루어지려면 이러한 인터페이스에 IP 주소가 필요하며 활성화되어야 합니다, 즉 켜져야 합니다. 그림에서 볼 수 있듯이 네트워크 인터페이스에 IP 주소를 쉽게 구성할 수 있습니다:
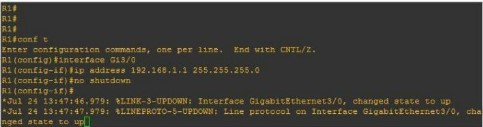
R1(구성)#인터페이스 FastEthernet0/0R1(구성-인터페이스)#ip 주소 192.168.1.1 255.255.255.0R1(구성-if)#비활성화 없음f) 라우터에서 원격 액세스 구성 (텔넷, SSH)
텔넷
네트워크 애플리케이션은 네트워크, 장치(예: 라우터 및 스위치) 또는 서버에 대한 안전한 원격 연결을 제공합니다. 이를 통해 어디서든지 신뢰할 수 있는 접근이 가능합니다.
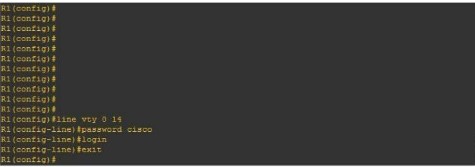
R1(구성)#라인 vty 0 14R1(구성-라인)#비밀번호 시스코R1(config-line)#로그인To get started, we’ll need to enter our virtual lines (a total of 15), set the password (“Cisco”), and then initiate the Telnet process #login.
SSH
To safely connect to a local area network or Internet device remotely, SSH is the ideal protocol. To configure this on Cisco machines, it’s necessary to take certain steps:
- 개인 로그인과 비밀번호 설정.
- 도메인 이름 설정
- 최대 안전성을 보장하기 위해 공개 및 개인 키 조합을 생성하는 것이 필수적입니다.
- 가상 라인(vty) 프로세스를 활성화하려면 명령 #login local을 사용하십시오.
아래 그림에서 Cisco 라우터에서 SSH 구성을 예로 볼 수 있습니다:
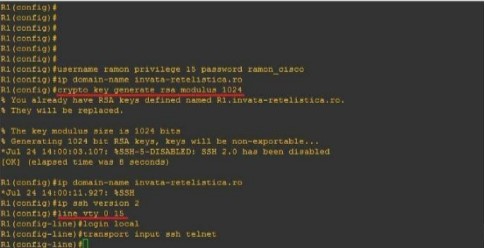
R1(구성)#사용자 이름 admin 권한 15 비밀번호 admincisco321R1(구성)#ip 도메인 이름 my.home.labR1(구성)#암호 키 생성 rsa 모듈러스 1024R1(구성)#ip ssh 버전 2R1(구성)라인 vty 0 15R1(구성-라인)#로컬 로그인R1(구성-라인)#전송 입력 ssh 텔넷요약하자면
라우터는 필수적입니다 device in any computer network because it interconnects multiple networks together. It has different networking protocols enabled (like RIP and OSPF) that assist him with the interconnection process. It also offers many different configurations for security purposes (like passwords on Virtual lines). In this article, we’ve learned how to set up an IP address on the Router, as well as for remote access (Telnet & SSH). We’ve also learned about some of the most important configurations 네트워크 관리자는 알아야 합니다.

세자르 다니엘 바레토
세자르 다니엘 바레토는 존경받는 사이버 보안 작가이자 전문가로, 복잡한 사이버 보안에 대한 심도 있는 지식과 복잡한 사이버 보안 주제를 단순화하는 능력으로 유명합니다. 네트워크 보안 및 데이터 보호에 대한 폭넓은 경험을 바탕으로 보안 및 데이터 보호 분야에서 폭넓은 경험을 쌓은 그는 정기적으로 최신 사이버 보안 트렌드에 대한 사이버 보안 트렌드에 대한 통찰력 있는 기사와 분석을 정기적으로 제공하고 있습니다.